Mitsubishi 3000GT & Dodge Stealth Forum banner

How To: Stealth to 3000gt *Walk-through*

53K views 64 replies 26 participants last post by  bumrocks  
#1 ·
As I see more and more folks considering, and accomplishing the Stealth base model or ES to 3000gt conversion it has come to my mind to do an entire write-up on the process for FAQ and as an estimate for prospective conversion doers as to how much work is involved. I will be illustrating it with pix of my own conversion but may ask for conversion pix from other conversion'ers. If anyone has any comments additions etc please post :D


So, lets get started.


Alright we shall run from the back to the front of the car in the removal stage.


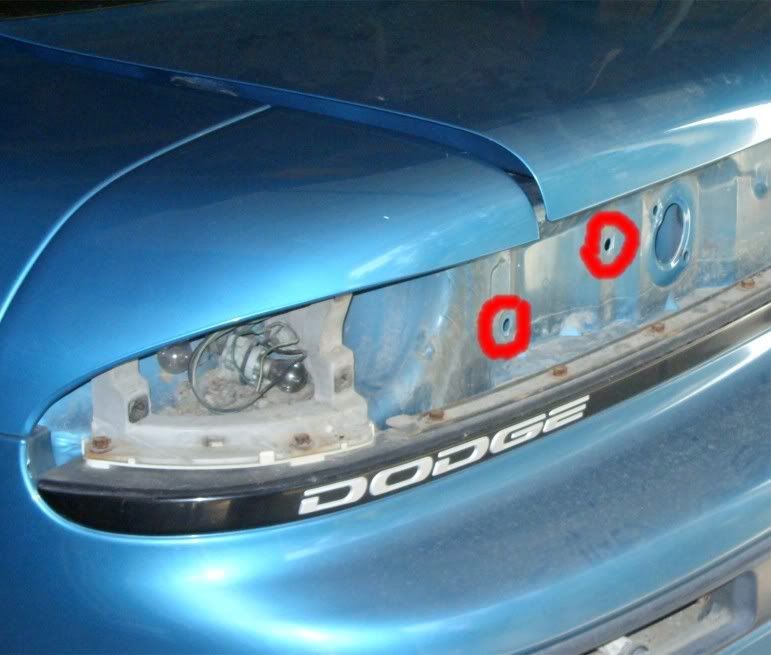
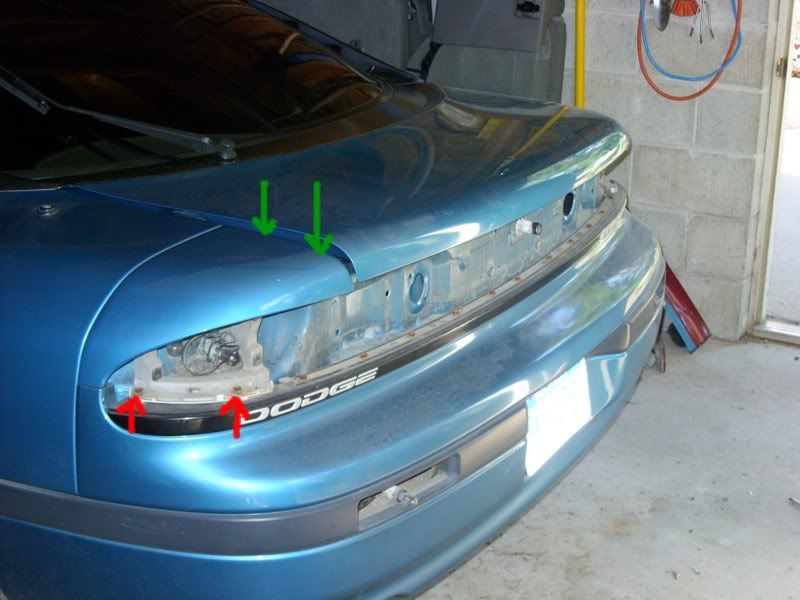
Step #1. TAIL LIGHT REMOVAL. To do this you must remove the nuts on the inside of the trunk. The tail lights must be removed FIRST before the center garnish can be removed. There are 2 nuts holding each light in place. (see below for location)

Image


Remove these bolts from the inside of the trunk and the light will slide out. Now rotate and remove each bulb from the light and remove the light.

*note* if you wish to remove the bulb and wiring assembly, you must go inside the trunk and unplug the harness, then it will simply slide out. If converting to 3000gt tail lights there is no need to take the bulb wire assemply out.
For further help on the tail lights, at the end of the first video available at the 3S PowerHour site there is a tutorial on how to do so.
Welcome to 3SiDIY.com!


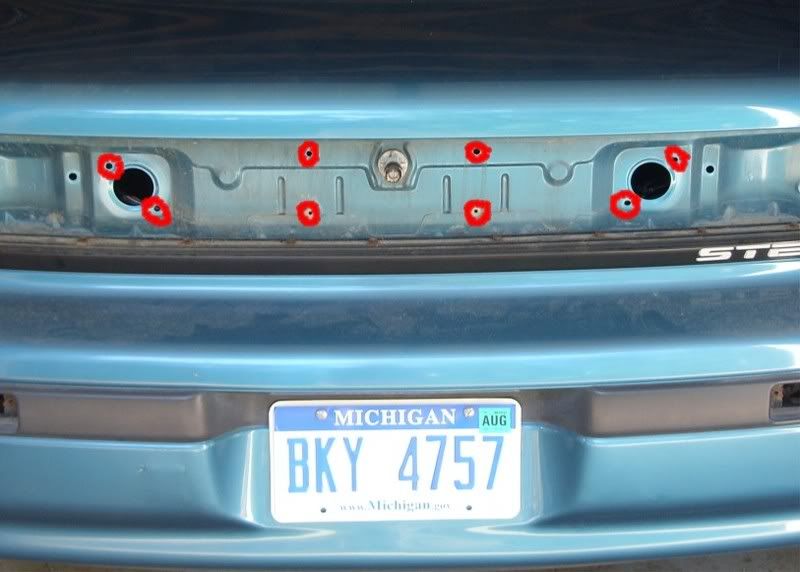
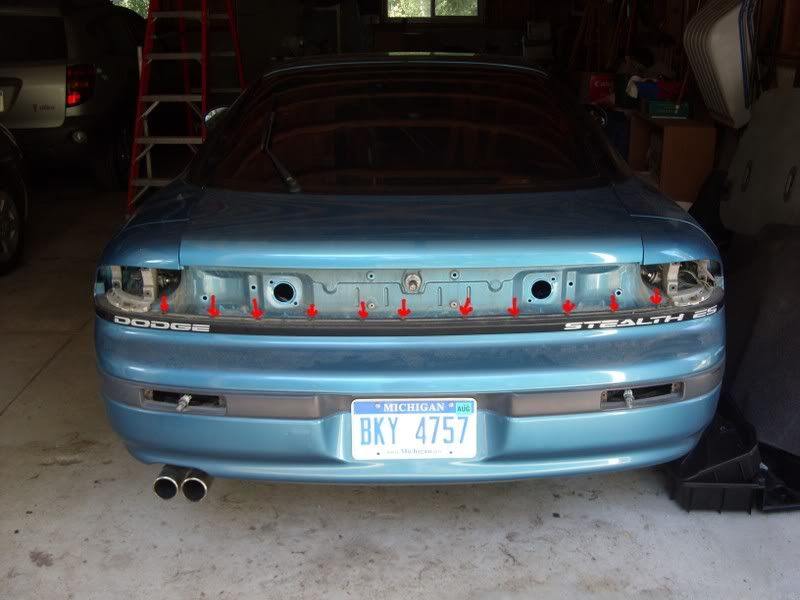
Step #2 CENTER GARNISH REMOVAL. To remove the center garnish, it is the same as the tail lights, just simply take each nut off from the inside of the trunk. there are 8 nuts to be taken off. (see below for locations)

Image


remove these nuts from the inside of the trunk and the center ganrish shall slide out straight backwards.


Step #3 REAR QUARTER PANEL EXTENSION REMOVAL. These are the small light housings attached to the quarter panel. To remove, first unbolt the support bracket. (see below/ red arrows)

Image


next, unscrew the screws holding it in place to the trunk area (see above/ green arrows). Now it will slide out horizontally.


Step #4 LICENSE PLATE REMOVAL. Simply unscrew the plate and remove. However when unbolting the bolts BEHIND the license plate only remove the two bolts holding the bumper cover to the bumper. There are, I believe three that hold the plate support bracket, DO NOT remove these bolts. The two to remove will be the two lower ones from the rest.


Step #5 REAR BUMPER COVER REMOVAL. Step one, remove the 11 bolts on the top of the cover. (see illustration below)

Image


Next remove the back-up lights, simply unscrew the screws holding it in place and it will slide out. Unplug the bulb and set aside.
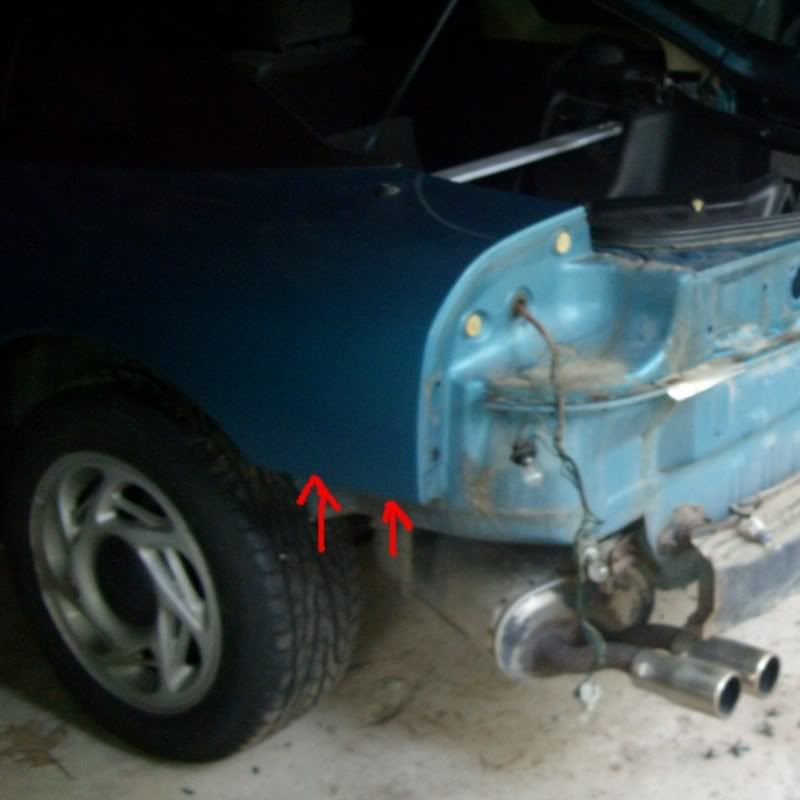
Next, there are dirt skirts in each wheel well, remove them. Once that is done there are 2 bolts holding the bumper in place from underneath, going into the bottom of the quarter panel.

Image


these can be reached with a ratchet and one if not two long extensions, from underneath the car.
Next, below the license plate on the underside of the bumper, there are 5 screw-clips. Remove them.
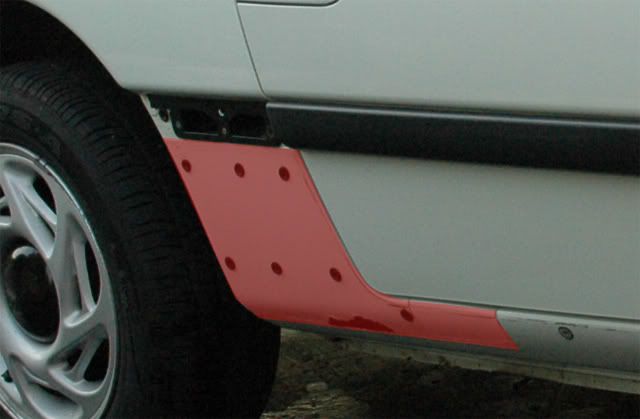
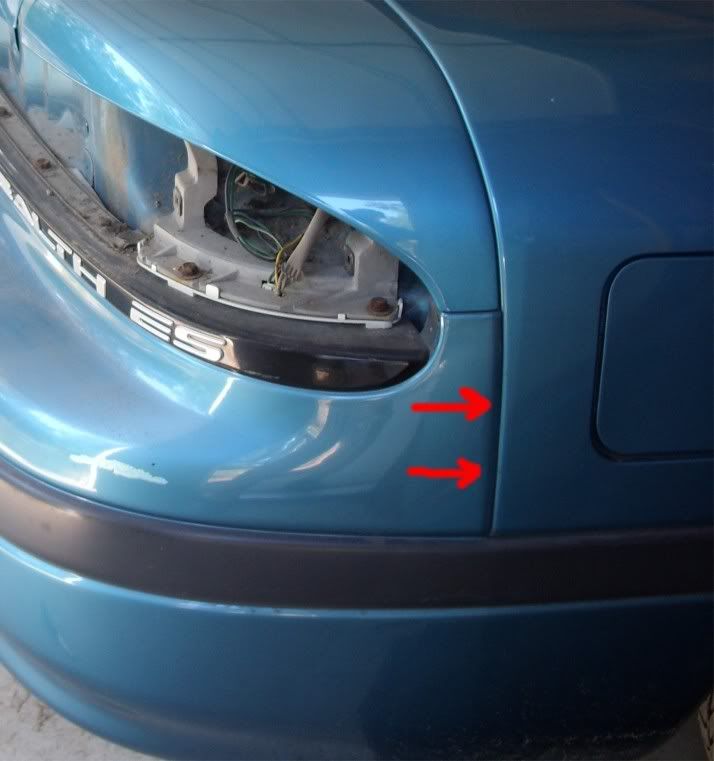
Now the hardest part, there are two nuts holding the bumper to the SIDE of the quarter panel, similar to the nuts used for the tail lights. They must be accessed via the trunk. best is to use a small ratchet and short extension. (see below for location, on the inside of the quarter panel of course)

Image


there are two for each side. This is probably the trickiest part of the bumper removal. Once these nuts are off, the bumper will slide off horizontally.


*CONGRATULATIONS YOU ARE 1/3 DONE WITH THE REMOVAL STAGE*
Go take a break, stretch, and pat yourself on the back :)
 
#2 ·
Alright, back from our break and party for being done with the first step. Now time to tackle the side skirts and infamous ES Trim.

Step #6 SIDE SKIRT REMOVAL. First of all, there are bolts along the underside of the car. Remove them, along with the screws on each end of the skirt. This is on the UNDERSIDE not the clips by the door.

Image


Once those bolts are removed, we go to the inside of the car. Remove all lower rear quarter trim interior (the one with the speaker cover in it). If help is needed with this, for the sake of thread length, refer to Stealth316.com for instructions). Now once that is removed, remove the seat belt "spool". Behind this will be a nut like from the tail lights holding the skirt in place. Remove it.
Next remove the dirt skirt from the front wheel well. at this point all that is holding the skirt on is the plastic clips. Start from the front and work backwards gently prying it off one clip at a time.

Step #7 SIDE TRIM REMOVAL. Time for that annoying strip to come off! This simply clips in with the same plastic clips as the skirt. Start from the FRONT of the door and pull out gently but firmly, it will pop out. Keep going down the door until the LAST clip. This does not pop out, you must slide the trim backward and off this clip.

The side should look like this:
Image

Oh and btw remove the black vent as seen in above picture.

*CONGRATULATIONS YOU ARE NOW 2/3 DONE WITH THE REMOVAL STAGE*
Take another break, the next stage can take a bit.
 
#3 ·
Alright now on the final step of the removal process!

Step #8 FRONT BUMPER COVER REMOVAL. First and foremost remove the turn signals. Unscrew the screw holding it in the front. It will now slide forward. Disconnect it and place aside.

Now to the center of the bumper. We will first deal with the section right on top and in front of the radiator. First, remove the rubber strip. Next remove the bolts along the inside of the bumper cover as shown below:

Image


Next, we will deal with the sides. First remove the front dirt skirts from both sides and set aside. You will also notice the dirt guards on the bottom of the bumper, removing these as well. Now there will be a bolt holding the bumper to the fender, an extension helps here to remove this bolt.

Image


Next set the headlights to the "up" position. Remove the bolt holding the headlight lens in place and remove it if not already removed.
Next remove the three bolts holding the lens bracket in place. At this point the bracket should be able to slide out with a little finagling.
Next, on the inside of the fender going vertical are several bolts holding the bumper in place, remove them. *See illustration below*

Image


Finally, underneath the bumper are a row of screw-clips holding the bumper to the radiator vent. Remove these and set aside. At this point the bumper will slide off horizontally with a little coaxing.

*CONGRATULATIONS YOU ARE DONE WITH THE REMOVAL STAGE!*
 
#4 · (Edited)
Now to the work that must be done to get the new parts to fit.

#1 Turn Signals. with the new bumper, the turn signals will come right in the way of the headlight bucket. You will need to cut a right triangle in the bucket to get the turn signal to fit.

Image


That is all the modification required for the front bumper.

#2 Side Skirts. First and foremost lets deal with the vent area. The red is the area which will need work.

Image


You have three options.
First, you can drummel or otherwise "cut/grind" this area down to get the vent to fit.
Second, you can "dent" this area in to fit. I chose this option being a blacksmith part-time I am very comfortable with hammers.
Third, cut the spot welded panel away to expose the correct clip holes and venting area. (Further instrustions in Stealth_E's post)
Use which way you feel more comfortable about doing.

Now one more step with the side skirt if you are NOT using Stealth_E's method, otherwise skirt this step. Just in front of the vent where the skirt meets the door, the skirt must be sanded down about 1cm or so.

Image


This can be done by hand with sand paper, however I used a power sander and it was much quicker.

At this point the side skirts should be ready to bolt/clip up :)

#3 Door Panels. The door panels will clip right on to the old, however there are no clip areas in the lower part of the door. It is recommended to use double sided M3 tape to hold the bottom part of the door cap on. I did this and it has worked wonderful.

#4 Good News. There is no modification for the rear bumper to fit on to your stealth back-side!

Now follow the reverse of the removal stage, only with the new 3000 bumpers/skirts/caps. Tada! Only one more thing to do... take pix and post here :D

Congratulations you have your own "Stealth GT".
 
#5 ·
Sir, you kickass, thank you!
 
#6 ·
My only addition to this, while it is very well-done, would be to add another more "correct" way to make the skirts fit. I removed the entire spot-welded in panel that the ES has. When you remove that, the metal that all 3000gts have and the metal that the skirts are from the factory meant to mount to is exposed and accessible. Basically, the ES's already have the EXACT correct mounting points for the skirts to fit w/ no modification, they're just under that stupid panel :). These pictures might help to explain what I'm talking about.

Image


Image


Also, I have a picture showing the section of metal to remove so that the 1st-gen 3000gt front turn signals fit, here:

Image


Lastly, this picture shows the location of the original backup lights wires, as well as where the wires for the new backup lights are in the center garnish. Not everyone realizes the ES cars had the wiring for center-garnish backup lights from the factory, but they do. The wires are taped up inside the trunk, behind the plastic panel, directly behind the two holes identified in red. So here they are:

Image


Nice job either way! I just wanted to add my own info too. This needs stickied.
 
#7 ·
Stealth_E thank you for your addition, that would have been very nice to know when I was doing my conversion lol hopefully it can help those in the future.
 
#8 ·
you guys give me hope yet. lol
 
#12 ·
While I agree with the last post before mine why get a stealth if you prefer the 3000gt? Plus how did you address the different rear quarter window cover. Never the less, great job on the write up and pictures.
 
#13 ·
Ok first the stealth question. At the time I was new to 3s so didn't really have a "taste" in them. Also tho, I very much prefer the stealth sails+3000 body over the 3000 sails. :)

Now about the sails. The walk-through involves basically the "body kit" not the sail panels. However I am contemplating making a write-up on how to switch from ES->R/T sails as well. There are a few who have actually converted the sail panels to a 3000gt as well but that's way more work then I want, and like i said I like the stealth sails better.
 
#19 ·
alright if you want any more detail then I go into here PM me.

Are you using the same wiring harness for the tail lights? If so, check your bulbs. if you are not using the same wiring harness, try switching harnesses. They all plug in the same so its not like one will work and one will not. (I assume you are talking base/ES conversion to 3000gt not r/t. because r/t is different and a little more complicated)
 
#18 ·
The dfferance between the windows is that the stealth windows are in front of the sail panels. The 3000gt windows are behind the sail panels. So basically with the stealth the little window flows together with the door window, whereas the 3000gt little window flows with the rear hatch window.

It has been done to do a swap of the small windows but its long and involved. It involves breaking the seal on the window, spot welding c-pillars from a 3000gt into the place of the stealth ones, and then redoing the glass and then finally the sail panel itself. IMO MUCH more work then gain, if you want it to look like a 3k that badly just buy a 3k.

Are there any threads giving details to change say... R/T skirts to 2nd gen GT skirts?
As far as I know they will bolt up fine. There should be the same bolt holes and everything you'll just need to get 3000gt door caps to go with the sideskirts. If you want a write-up on changing only the sideskirt check stealth316.com under "side air dam".
 
#20 ·
very very nice write up sir!!
thanks for the info.
 
#27 ·
the only problematic area with the rear bumper is the area where it attaches with the quarter panel. With having to remove the trunk plastics, and finagle your arm back in there ESP! the passenger side one. Can be a real pain, literally lol

once you get it done be sure to post up pics! good luck! :cool:
 
#26 ·
It's such a tough choice.. the 2nd or 3rd gen front ends make the 1st gen look much more modern.. i have a first gen... but I hardly ever see any cars with pop-ups anymore.. so I kind of want the modern look, but the pop-ups are more unique and , when seen on a 3S, the kiddies are always like :eek:

Also anybody got any pics of : 1st gen stealth skirts/sails, 99 front end, hoop spoiler? by chance... :D
 
#29 ·
Well written, but a sickening thread.
 
#33 · (Edited)
I think too many people assume this thread is going to help all the Stealth R/T guys convert to 3000gt's. Really that's not the case at all. It's almost exclusively for the benefit of the ( not attractive ) Stealth ES/Base model cars that don't have the Stealth R/T headlight and taillight setup.

Cars like these ( how my car started life ):

Image

Image

Image


If you're riding into this thread on your 3000gt "high horse" to poke fun at the Stealth owners don't bother. It really gets old.

Refer to the pictures in my signature...
 
#36 ·
while i can understand someone's wants to make their ES more aesthetically pleasing to the eye, don't expect value to increase when combining parts from two different makes or models. They will only increase in value when parts cars start getting pulled and rebuilt to make real turbo coupes.