
finding information on this product was close to impossible but not anymore! anyone have any questions feel free to ask. ill do my best to describe my actions in the order i performed them, if something seems to be missing let me know and ill try to fill the gap. this is the only write-up on 3si (that i found) well here you go enjoy!") (i did not undo the battery so i could check for current...so its not necessary but it is recommended)
(i did not undo the battery so i could check for current...so its not necessary but it is recommended)
you will need:
-10mm socket
-a medium extension
-a long extension
-2 screw drivers (1-skinny flat-head and 1 medium sized philips-head)
-wire strippers you can fit in tight places
-wire cutters/dikes
-small "inline" wire connectors (the ones you crush around the wire)
-zip-ties are handy
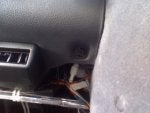
1) there are 2 bolts located near the bottom of the "knee-board" in opposite corners
**see first two pix** (just found out i cant attach more than 3)
2) pop out the rear window wiper switch and the gauge light dimmer and mirror adjuster switch with a flat-head screw driver.
**see second two pix**
unplug them and push the plugs out of the way. now you will see 2 more bolts, use the medium extension to help reach these.
**see next two pix**
3) remove the 2 phillips-head screws holding in the hood release and pull it down enough to remove the cable (its complicated to explain just look at it til it makes sense) once this is removed the knee-board is ready to be removed
4) remove the 3 phillips-head screws holding up the lower air duct, you will also have to pull the inlet from the rest of the air "system"
**see next 3 pix** (last one is the air duct removed)
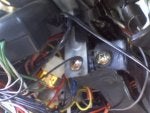
5) hopefully you are very flexible cause its time to move the seat back and to crawl under the dash. what you are looking for is the silver-looking box near where your left knee would be with 2 connectors attached to it one 20-pin (the top one) and one 16-pin (the bottom one) remove these connectors to get to a 10mm bolt (use the extension), there is a second bolt on the opposite side
**see these 2 pix**
6) now that it is free reconnect the plugs and pull the ETACS down so it is easier to get to, using the dikes CAREFULLY cut the electrical tape little by little as far up as you can, you are going to want enough wire to be able to reconnect it in case your car is differant than mine
7) the third wire in colored black with a blue stripe is almost in the middle of the connector, separate it from the rest of the harness using your fingers (enough to safely cut it and strip from 3/16" to 1/4") to be sure this is the right wire try to turn the headlights on (they should not go up but should turn on)
8) attach the red wire to the grey wire (as said by 3sx.com) and find a spot for the ground wire (**i put mine where the lower air duct screws to metal, see pic**) attach the grey wire to the wire going to the ETACS and attach the yellow wire to the wire leading away from the ETACS in the harness using the "inline" connectors
9) find a safe place for all the wires that wont get in the way when you re-attach the lower air duct and re-attach the knee-board (be sure to keep track of the hood release cable so you can feed it through the hole where hood release goes) find a place to mount the module and connect it (test it out by setting an angle (0 being highest up and 80 being all the way down) then turning on the lights, they should only go up according to how you set it)
there you go enjoy!!! fell free to ask questions
AFTER FURTHER RESEARCH EITHER BLACK WITH RED WIRE (STATED EARLIER IN POST AS BEING THE ONE I THOUGH WAS WRONG) OR THE BLACK WITH BLUE WIRE MAY BE USED! the black with blue will control how high the headlights go while the lights are ON, the black with red will control how far down they go after the headlights are turned OFF
(i did not undo the battery so i could check for current...so its not necessary but it is recommended)you will need:
-10mm socket
-a medium extension
-a long extension
-2 screw drivers (1-skinny flat-head and 1 medium sized philips-head)
-wire strippers you can fit in tight places
-wire cutters/dikes
-small "inline" wire connectors (the ones you crush around the wire)
-zip-ties are handy
1) there are 2 bolts located near the bottom of the "knee-board" in opposite corners
**see first two pix** (just found out i cant attach more than 3)
2) pop out the rear window wiper switch and the gauge light dimmer and mirror adjuster switch with a flat-head screw driver.
**see second two pix**
unplug them and push the plugs out of the way. now you will see 2 more bolts, use the medium extension to help reach these.
**see next two pix**
3) remove the 2 phillips-head screws holding in the hood release and pull it down enough to remove the cable (its complicated to explain just look at it til it makes sense) once this is removed the knee-board is ready to be removed
4) remove the 3 phillips-head screws holding up the lower air duct, you will also have to pull the inlet from the rest of the air "system"
**see next 3 pix** (last one is the air duct removed)
5) hopefully you are very flexible cause its time to move the seat back and to crawl under the dash. what you are looking for is the silver-looking box near where your left knee would be with 2 connectors attached to it one 20-pin (the top one) and one 16-pin (the bottom one) remove these connectors to get to a 10mm bolt (use the extension), there is a second bolt on the opposite side
**see these 2 pix**
6) now that it is free reconnect the plugs and pull the ETACS down so it is easier to get to, using the dikes CAREFULLY cut the electrical tape little by little as far up as you can, you are going to want enough wire to be able to reconnect it in case your car is differant than mine
7) the third wire in colored black with a blue stripe is almost in the middle of the connector, separate it from the rest of the harness using your fingers (enough to safely cut it and strip from 3/16" to 1/4") to be sure this is the right wire try to turn the headlights on (they should not go up but should turn on)
8) attach the red wire to the grey wire (as said by 3sx.com) and find a spot for the ground wire (**i put mine where the lower air duct screws to metal, see pic**) attach the grey wire to the wire going to the ETACS and attach the yellow wire to the wire leading away from the ETACS in the harness using the "inline" connectors
9) find a safe place for all the wires that wont get in the way when you re-attach the lower air duct and re-attach the knee-board (be sure to keep track of the hood release cable so you can feed it through the hole where hood release goes) find a place to mount the module and connect it (test it out by setting an angle (0 being highest up and 80 being all the way down) then turning on the lights, they should only go up according to how you set it)
there you go enjoy!!! fell free to ask questions
AFTER FURTHER RESEARCH EITHER BLACK WITH RED WIRE (STATED EARLIER IN POST AS BEING THE ONE I THOUGH WAS WRONG) OR THE BLACK WITH BLUE WIRE MAY BE USED! the black with blue will control how high the headlights go while the lights are ON, the black with red will control how far down they go after the headlights are turned OFF